The premier source for backgammon books, lessons and blog problems with world champion Bill Robertie.

88 Park Avenue, Suite 302 | Arlington, MA 02476 | 781-641-2091

The premier source for backgammon books, lessons & blog problems.
“I’ve just finished Chapter 6 of Volume II. I must say that if you aren’t the greatest BG player who ever lived, you certainly are the greatest writer. It’s not even close. Your explanations are so clear and logical that anyone can and will improve by studying them.”

Blog Category

Backgammon Problems: Priming Games

Browse

Browse blog categories using the drop-down.

Priming Games – Escape or Attack

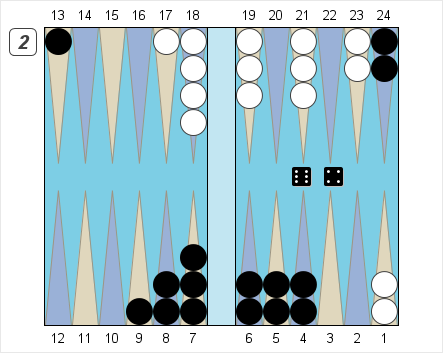
Money game, White owns the cube.
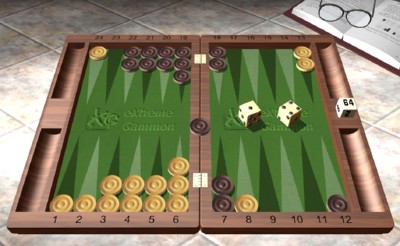
White to play 4-1.

This position is not difficult but it illustrates a key idea in priming games, whether prime against prime or prime against blitz: Do the hardest thing first, and force your opponent to do a hard thing in reply.

By “hard thing” I mean anything that you are a 70-30 underdog (or worse) to do. Usually this implies anything that must be done and which requires a single number on the dice. When we begin thinking in terms of “doing hard things” and “making our opponent do hard things”, complicated positions can start to look pretty simple.

Here, for instance, it’s clear that Black’s prime will not break. Black has to come in from the bar, which might take a while, after which he has the checkers on the 18-point to move, as well as the checker which just entered and the checker on the midpoint. So to win, White will have to escape his rear checker, and that will require an ace (a “hard thing”) plus a six (another “hard thing”). Since he just threw an ace, he wants to play 24/23 if at all possible. Since he can use the four to make both a 5-point board and a 5-prime, that’s his play. He should move 24/23 and 6/2.

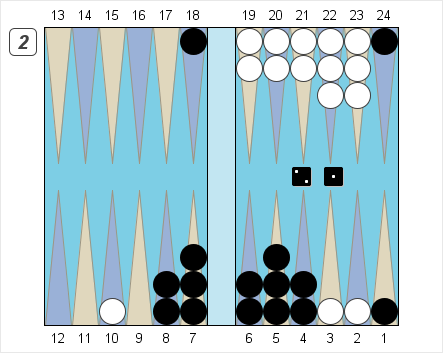
What would it take for White to pass up 24/23 with the ace? In most variations of this position, 24/23 will remain correct, but here’s an example where it’s a mistake:

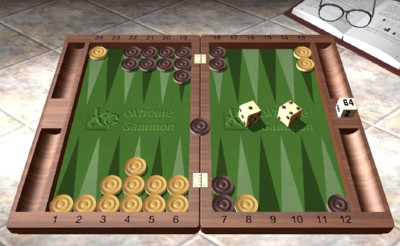
Position A: White to play 4-1.

Without a 5-point board to give Black something “hard” to do, White doesn’t have the security of moving to the 23-point. Here he has to play 2/1, to keep Black on the bar for some time. After that, either 8/4 or 13/9 are about equal.


Priming Games: Action versus Timing


The next position is an interesting problem with a few non-standard elements. On the one hand, it’s a prime versus prime problem; both sides have 5-point primes, and both sides have some escaping to do. On the other hand, it’s an action play problem. White is on the bar shooting at a couple of blots, and a lot hinges on whether he hits or not next turn.

Money game, center cube, White on roll.

Should White double? What should Black do if White doubles?

read more…

Creating Bad Numbers

This next problem shows a somewhat unusual middle game position. White, with one checker in the air, has an outside prime with the 5-point slotted. Black has a bizarre position with four checkers back on his 24-point. His front game is normal enough, with the start of a little block. Last turn, White doubled from the bar and Black bravely took. (A small mistake, actually. The position is a pass, although not by much.)

Money game, Black owns the cube, White on roll.
White to play 5-2.

White’s 5-2 from the bar gives him a few choices. Here’s a quick list of the main options:

(1) Bar/23 13/8. The safest play, this keeps the back checker from being attacked on the 20-point, while adding another cover number for the 5-point.

(2) Bar/20 5/3. Another safe option, this time duplicating twos. This also prevents Black from simultaneously hitting and getting to the edge of White’s prime. The downside of the play is that it becomes hard for White to build on his early advantage. Covering the 3-point won’t make his game appreciably stronger.

(3) Bar/20 13/11. This play is a different way of bringing down another cover number to make a 5-prime.

(4) Bar/20 7/5. This play shifts points, covering the 5-point and leaving the bar-point slotted.

Those are all the reasonable plays; anything else we can eliminate quickly. The next step is pruning our tree a little bit more. Are there any of these play that don’t stand up to a closer inspection?

To make progress, let’s focus on our opponent for a second. What is his big weakness, and what are his awkward numbers?

Black’s main problem, clearly, is that mass of checkers on his 24-point (our ace-point). Black needs to get those checkers moving quickly, before his front game stalls and collapses. He can move them with aces through fours, but his fives and sixes are blocked. That insight lets us toss two of our candidates right away. Move (1), Bar/23 13/8, makes fives and sixes somewhat useful by letting him hit on our 23-point. Move (4), Bar/20 7/5, makes sixes not only active but highly useful, letting him step out to our bar-point while hitting at the same time. Let’s eliminate both those moves and focus on the last two, Bar/20 5/3 and Bar/20 13/11.

The choice between these two plays hinges on the cube position. We’ve given the cube away, so we want to finish Black off as quickly as possible. Making a prime is the best way to do that, and the risk (a single shot) is not that great. Playing 5/3, after all, still gives Black a shot, and on a point we don’t really care about making. So let’s leave our blot where it belongs and play Bar/20 13/11. Making the prime wraps up the game – if Black misses, he’s in a hopeless position with nowhere near the timing to play a back game.

(Incidentally, if we had forgotten to double last turn so the cube was still in the middle, then 5/3 would be right. The idea in that case would be to minimize the chance of a big downswing so we could keep our advantage and turn the cube on the following turn.)

Using Diversification

Here are two closely related positions which illustrate an idea called diversification, which is the opposite of duplication. Duplication enables us to reduce our opponent’s good shots by moving so that the same number works for him in different parts of the board. Diversification increases our own good shots by giving us different numbers working in separate parts of the board. It’s a quick and useful tool that will generally point to good plays.

read more…

Handling Six-Primes

Six-primes are the ultimate containment formation in backgammon, but even a six-prime is no guarantee of winning. Here’s a couple of problems illustrating the strengths and weaknesses of six-point primes.

(a) Black on roll, money game, White owns the cube.

White – Pips 118 (-19)

Black – Pips 137 (+19)
Black to Play 6-4
 

read more…

5-Prime versus 5-Prime

White – Pips 105 (-10)

Black – Pips 115 (+10)
Black to Play 2-1
This problem shows us one of the most interesting middle game positions possible: both sides have a 5-prime, and neither side has an anchor. The play will be razor-sharp, and gammons will be floating in the air for both Black and White.

What are the goals in these positions? Here’s what the players are trying to do, arranged roughly in order of importance:
read more…